Showing posts with label Fixing Errors. Show all posts

Thursday, 24 March 2016

How To Fix Android Can't Write External SD Card (while Saving Downloaded Data on SD Card) Error

Hello Reader My name is Shanzay khan & Today i am Going To Show You How To Fix Android can't Write External SD Card (while Saving Downloaded Data on SD Card) Error
So Lets Start;
How To Fix Android Cant Write External SD Card (while Saving Downloaded Data on SD Card) Error


You Already Knows That Android Developers Has Putted Some Restriction's so You Cant be Able to save The Downloaded Things On your SD Card Directly

So in this Trick I am Going to show you How To Remove This Restrictions
First of All you have To Do is You Have To Root Your Device I have Told That How To Root Your Device In My Previous Posts But Today I Will Tell You the simplest & The Easiest Method Ever To Root your Device
All You have To Do is Download This Apk File Name Kingo Root Apk Provided By Kingo Root from here;
  Kingo Android Root.apk
After Downloading Install It & Open It Click on The One Click root & It Will start Rooting Your Device
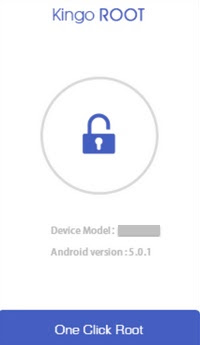
How To Fix Android Cant Write External SD Card (while Saving Downloaded Data on SD Card) Error

 Once your Device Is Rooted Follow the Below Steps
    • Make Sure Your Device has Been Rooted
    • Make A Backup Of All OF YOur Data In device
    • Then Open Root Browser & navigate to /system/etc/permissions
     
    How To Fix Android Cant Write External SD Card (while Saving Downloaded Data on SD Card) Error
    How To Fix Android Cant Write External SD Card (while Saving Downloaded Data on SD Card) Error

     You can Download Root Browser Paid Version From Here
  • Root Browser Paid Version Only For You
    • In Permissions Edit platform.xml and find the Section Named “WRITE_EXTERNAL_STORAGE“
    •  Add a Additional command under WRITE_EXTERNAL_STORAGE : <group gid=”media_rw” />
     
    How To Fix Android Cant Write External SD Card (while Saving Downloaded Data on SD Card) Error
    How To Fix Android Cant Write External SD Card (while Saving Downloaded Data on SD Card) Error
    • Save The Changes & Restart your device
    Now You Should Be Able To Save Files Directly To Your SD Card Instead Of Copying Or Moving Files From Phone Storage To SD Card
    I You are Having Problem in Anything I have Briefly Explained This Method Below.
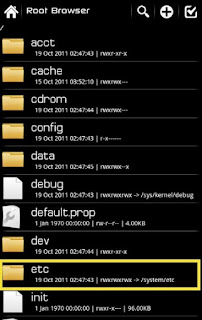
 Briefly Explained Above Method;
  • First you will have To Download Root Browser Install It & Open it
  • It Will Ask You To Download Utilities Click Yes Wi8 For To Download Its Utilities
  • Now You Will See A System In this Folder you Will Have To Navigate To etc & In Permission & in Permissions Find Platform.xml click On it & Open it As the Text File Now That The file has been Open Find WRITE_EXTERNAL_STORAGE in that file & Under That You Will have to Enter This Additional Command <group gid=”media_rw” /> After Putting This Save It & Restart Your Device
  • Now You Should Be Able to Write Your External SD Card
Done Enjoy Keep Visiting MuzamilTricks.com & Don't Forget To Follow Me On SOcial Media
Shanzay khan
Facebook
Twitter
Google Plus

Sunday, 7 February 2016

How to fix DNS BAD CONFIG ERROR.

Hello users my name is shanzay khan & today i am going you to show

How to fix DNS BAD CONFIG ERROR


Fix “DNS_PROBE_FINISHED_BAD_CONFIG” in 3 ways:

You can Come across DNS_PROBE ERROR error in Google Chrome, Firefox or any other Browser. The error Stops you from accessing Web Pages like Facebook, Gmail or Google.com itself. This Error in your Browser Points out that DNS lookup Failed while loading the webpage for you.
Today we will Fix These Errors In # Simple Steps

Note: ONLY FOR WINDOWS USERS

METHOD NO 1:By Renewing Your Ip Adress Using Command Prompt:
In this Method, you will be releasing your ip address and then renewing it again. If the Problem is with your IP address then this method should work for you. Just Follow the Below Simple Steps.

Step 1: Open Command Prompt(cmd) By Pressing Combination of Windows key + R to open run. Now type in “cmd” and Hit Enter.
Alternatively, you can Press Windows Key + X , then Click on Command Prompt (Admin).
Step 2: Now that your Command Prompt is ready, Type in ipconfig /release then hit enter.

Step 3: Now again type in ipconfig /renew and hit enter. This will Renew your IP address.

Step 4: Close the Command Prompt and open your Favorite Browser to Check if the Problem is solved
This Is The Most Popula & Common Fix This Should Fix Your Error if Not Try 2nd Method

Method 2: Flushing DNS:
In This Method We will Be Flushing DNS to Solve Error Code: DNS_PROBE_FINISHED_BAD_CONFIG. This will Most Probably Solve the issue if the Problem is in your DNS Cache. Follow below Steps.
How to fix DNS BAD CONFIG ERROR

    •    First of all Open Command prompt.
    •    No type in “ipconfig /flushdns” without Quotes and hit Enter.
    •    You can see your dns is succuessfully Flushed.
    •    Open your Browser and see if the issue is still there or you have now fixed it.

Alternatively instead of ipconfig /flushdns you can also type “netsh winsock reset catalog” and see if that works. Move on to the Next and Final Method if this doesn’t help.


Method 3:Correcting Pc DNS Settings.
If both of the above method didn’t helped you to fix DNS_PROBE_FINISHED_BAD_CONFIG error then Use this method. It Requires you to do minor Tweaking in your DNS Settings But In most cases this fixes the issue if done correctly. Follow the below Explained Steps.
    1.    Right Click on Network icon in taskbar then click on Open Network and Sharing Center.
    2.    Now from the Left pane, find and Click Change Adapter Settings. This will Open up Network Connections.
    3.    You will be presented with a new window with all Network Connections, Right Click on Active Connection and select Properties.
    4.    Now look for Internet Protocol Version 4 (TCP/IPv4), Double Click on it to open its Properties.
    5.    In the Properties Window, Click on Use the Following DNS Server Addresses and Type in 8.8.8.8 in Preferred DNS Server and 8.8.4.4  in Alternate DNS Server Just like shown in Below Picture. Then Click on OK.

How to fix DNS BAD CONFIG ERROR

Now Open your Browser and you will see that you have successfully Fixed Error Code DNS_PROBE_FINISHED_BAD_CONFIG now.
Done Enjoy Keep Visiting Muzamiltricks,com