Showing posts with label Blogger Widgets. Show all posts

Wednesday, 30 December 2015

Add A Google Translate Widget To Your Blogger Blog

Hello Readers my name is Muzamil Hussain.Today i,m Going to Tell You How To Add A Google Translate Widget To Your Blogger Blog.If your blogger blog is starting to draw an audience and traffic from overseas or you need to team up with different schools over everywhere throughout the world, you will need to locate an extraordinary approach to decipher your blogger blog content into various dialects of the world.So, a standout amongst the most vital inquiries we get from movement or our guests or companions is the means by which to actualize Google Translator gadget on their blogger blogs.This brisk and simple procedure will help you set up a Google Translator gadget to your blogger blog to make it very easy for increasing  your blog audience to translate your website with the help of a single click.

Add A Google Translate Widget To Your Blogger Blog


  • First Of  All Go To Google  Translator Link.
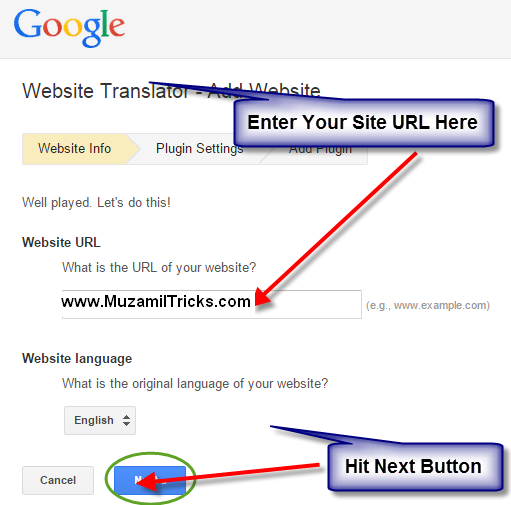
  • After This, This Page Asking To You To Enter Your WebSite Address Where You Want To Display That Google Translator Widget.
Add A Google Translate Widget To Your Blogger Blog


  • Just Enter Your Web Site Address.
  • Now Hit On "Next" Button.
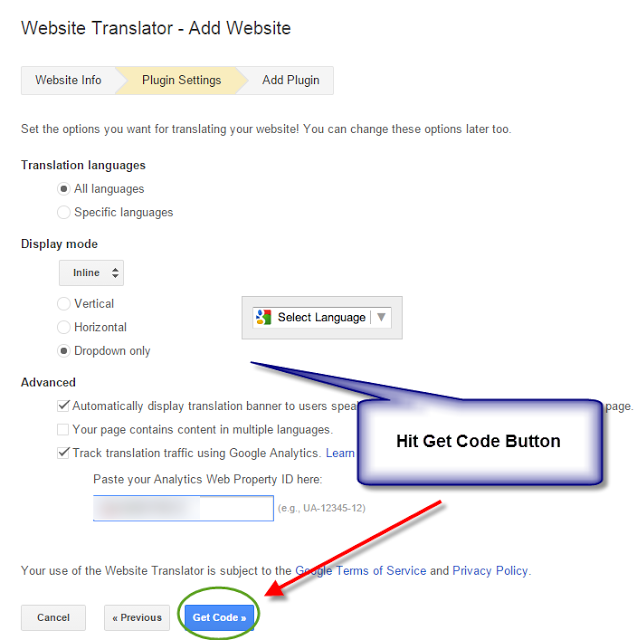
  • You Are At 2nd Stage.

Add A Google Translate Widget To Your Blogger Blog

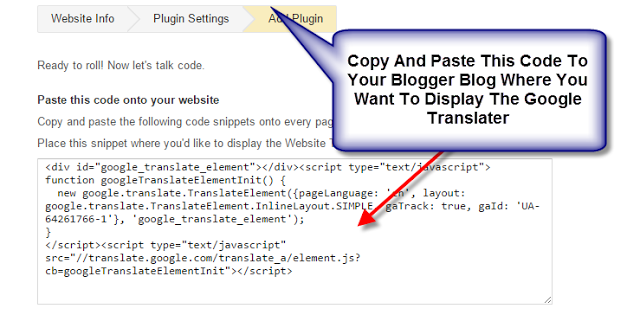
  • Just Hit "Get Code" Button.
  • A Code Will Be Appear/Generate,Just Copy That Piece Of Code.

Add A Google Translate Widget To Your Blogger Blog
  • Now You Go To Your Blogger Dashboard.
  • Select "Layout".
  • Select " Add A Gadget" Link.
  • And Open HTML/JavaScript Widget.
  • Just Paste Your Google Translator Code In To That Blog Widget.
  • Save Your Widget.
  • Now Visit your Blog,You Can See Your Working Google Translator.
If you Like this Article Soo Share your,s Friends and tell About our site,If you have any problem soo contect us Feel Free Thanx.

www.MuzamilTricks.com

Friday, 13 November 2015

How To Add Beautiful Facebook Like Popup Blogger Widgets

Hello Readers My Name is Muzamil Hussain.Today, we discuss so beautiful Facebook popup like button for blogger blog with lovely look. Blogger Widget: Add Beautiful Facebook Like Popup. Facebook is a most popular social media website site in the world and millions of people use it on daily basic. So, it is a wonderful chance for you to get a lot of traffic for your blog through Facebook. For getting a lot of traffic on daily basic, you should to add a Facebook like button in your blog. So, in this article we learn how to add a Blogger Widget: Add Beautiful Facebook Like Popup.How To Make Verify Paypal In Pakistan.
How To Add Beautiful Facebook Like Popup Blogger Widgets

How To Add Beautiful Facebook Like Popup Blogger Widgets

Step # 1: Go to your Blogger Dashboard

Step # 2: Click on Layout > Add a Gadget > HTML/JavaScript.

Step # 3: Copy the following code and paste into the HTML/JavaScript box.

<style>
#scrollwig {
position: fixed;
right: -510px;
z-index: 4;
opacity:0.99;
width: 275px;
bottom: -300px;
}
#scroll_content{
border: 5px solid #FFF;
border-radius: 150px 150px 0 150px;
box-shadow: -3px 3px 4px #BFBFBF;
margin-bottom: 0;
}
#follow {
background-color: #FFF;
border:15px groove #F8DA39;
border-right: none;
border-bottom: none;
border-radius: 150px 150px 0 150px;
font-size: 0.9em;
height: 185px;
margin-bottom: 0;
padding: 40px;
text-align: center;
}
.text{margin:0 0 0 0}
.para1 {
font-size: 1.9rem;
font-weight: normal;
font-family: oswald;
padding-bottom: 0.1em;
margin: 0 0 0 0;
letter-spacing: 1px;
color: #47401A;
}
.para2 {
width: 120%;
margin: 0 0 0 -9%;
font-size: .8rem;
}
.fbfollow {
color: #3B5998;
font-size:1.3rem;
font-weight:bold
}
.googlefollow {
color: #D34836;
font-size:1.3rem;
font-weight:bold
}
</style>
<script>
mdfbw=”MuzamilTricks
var _0xb6f0=[“\x73\x63\x72\x6F\x6C\x6C\x54\x6F\x70″,”\x66\x61\x64\x65\x49\x6E”,”\x23\x73\x63\x72\x6F\x6C\x6C\x77\x69\x67″,”\x66\x61\x64\x65\x4F\x75\x74″,”\x73\x63\x72\x6F\x6C\x6C”];$(document)[_0xb6f0[4]](function (){var _0x6b02x1=$(this)[_0xb6f0[0]]();if(_0x6b02x1>1500){$(_0xb6f0[2])[_0xb6f0[1]]();} else {$(_0xb6f0[2])[_0xb6f0[3]]();} ;} );
var _0x7f48=[“\x3C\x64\x69\x76\x20\x63\x6C\x61\x73\x73\x3D\x27\x73\x6C\x69\x64\x65\x72\x62\x6F\x78\x5F\x30\x36\x27\x20\x69\x64\x3D\x27\x73\x63\x72\x6F\x6C\x6C\x77\x69\x67\x27\x20\x73\x74\x79\x6C\x65\x3D\x27\x72\x69\x67\x68\x74\x3A\x20\x30\x70\x78\x3B\x20\x62\x6F\x74\x74\x6F\x6D\x3A\x20\x30\x70\x78\x3B\x27\x3E”,”\x77\x72\x69\x74\x65″,”\x3C\x64\x69\x76\x20\x69\x64\x3D\x27\x73\x63\x72\x6F\x6C\x6C\x5F\x63\x6F\x6E\x74\x65\x6E\x74\x27\x3E”,”\x3C\x64\x69\x76\x20\x69\x64\x3D\x27\x66\x6F\x6C\x6C\x6F\x77\x27\x3E”,”\x3C\x64\x69\x76\x20\x63\x6C\x61\x73\x73\x3D\x27\x74\x65\x78\x74\x27\x3E”,”\x3C\x70\x20\x63\x6C\x61\x73\x73\x3D\x27\x70\x61\x72\x61\x31\x27\x3E\x4C\x69\x6B\x65\x20\x55\x73\x20\x4F\x6E\x3C\x2F\x70\x3E”,”\x3C\x70\x3E\x3C\x73\x70\x61\x6E\x20\x63\x6C\x61\x73\x73\x3D\x27\x66\x62\x66\x6F\x6C\x6C\x6F\x77\x27\x3E\x46\x61\x63\x65\x62\x6F\x6F\x6B\x3C\x2F\x73\x70\x61\x6E\x3E\x3C\x2F\x70\x3E”,”\x3C\x62\x72\x2F\x3E”,”\x3C\x21\x2D\x2D\x20\x46\x62\x20\x42\x75\x74\x74\x6F\x6E\x20\x2D\x2D\x3E”,”\x3C\x64\x69\x76\x20\x63\x6C\x61\x73\x73\x3D\x27\x66\x62\x27\x20\x73\x74\x79\x6C\x65\x3D\x27\x66\x6C\x6F\x61\x74\x3A\x6E\x6F\x6E\x65\x3B\x70\x6F\x73\x69\x74\x69\x6F\x6E\x3A\x72\x65\x6C\x61\x74\x69\x76\x65\x3B\x20\x6D\x61\x72\x67\x69\x6E\x3A\x30\x70\x78\x20\x30\x70\x78\x20\x30\x70\x78\x20\x36\x33\x70\x78\x27\x3E”,”\x3C\x69\x66\x72\x61\x6D\x65\x20\x73\x72\x63\x3D\x22\x2F\x2F\x77\x77\x77\x2E\x66\x61\x63\x65\x62\x6F\x6F\x6B\x2E\x63\x6F\x6D\x2F\x70\x6C\x75\x67\x69\x6E\x73\x2F\x6C\x69\x6B\x65\x2E\x70\x68\x70\x3F\x68\x72\x65\x66\x3D\x68\x74\x74\x70\x73\x25\x33\x41\x25\x32\x46\x25\x32\x46\x77\x77\x77\x2E\x66\x61\x63\x65\x62\x6F\x6F\x6B\x2E\x63\x6F\x6D\x25\x32\x46″,”\x26\x61\x6D\x70\x3B\x77\x69\x64\x74\x68\x26\x61\x6D\x70\x3B\x6C\x61\x79\x6F\x75\x74\x3D\x62\x6F\x78\x5F\x63\x6F\x75\x6E\x74\x26\x61\x6D\x70\x3B\x61\x63\x74\x69\x6F\x6E\x3D\x6C\x69\x6B\x65\x26\x61\x6D\x70\x3B\x73\x68\x6F\x77\x5F\x66\x61\x63\x65\x73\x3D\x66\x61\x6C\x73\x65\x26\x61\x6D\x70\x3B\x73\x68\x61\x72\x65\x3D\x66\x61\x6C\x73\x65\x26\x61\x6D\x70\x3B\x68\x65\x69\x67\x68\x74\x3D\x36\x35\x26\x61\x6D\x70\x3B\x61\x70\x70\x49\x64\x3D\x35\x34\x39\x35\x31\x30\x37\x38\x38\x34\x30\x33\x32\x31\x35\x22\x20\x73\x63\x72\x6F\x6C\x6C\x69\x6E\x67\x3D\x22\x6E\x6F\x22\x20\x66\x72\x61\x6D\x65\x62\x6F\x72\x64\x65\x72\x3D\x22\x30\x22\x20\x73\x74\x79\x6C\x65\x3D\x22\x62\x6F\x72\x64\x65\x72\x3A\x6E\x6F\x6E\x65\x3B\x20\x6F\x76\x65\x72\x66\x6C\x6F\x77\x3A\x68\x69\x64\x64\x65\x6E\x3B\x20\x68\x65\x69\x67\x68\x74\x3A\x36\x35\x70\x78\x3B\x22\x20\x61\x6C\x6C\x6F\x77\x74\x72\x61\x6E\x73\x70\x61\x72\x65\x6E\x63\x79\x3D\x22\x74\x72\x75\x65\x22\x3E\x3C\x2F\x69\x66\x72\x61\x6D\x65\x3E”,”\x3C\x2F\x64\x69\x76\x3E”,”\x3C\x64\x69\x76\x20\x73\x74\x79\x6C\x65\x3D\x22\x66\x6C\x6F\x61\x74\x3A\x20\x72\x69\x67\x68\x74\x3B\x66\x6F\x6E\x74\x2D\x73\x69\x7A\x65\x3A\x20\x2E\x36\x35\x72\x65\x6D\x3B\x63\x6F\x6C\x6F\x72\x3A\x20\x23\x33\x32\x33\x32\x33\x32\x3B\x70\x6F\x73\x69\x74\x69\x6F\x6E\x3A\x20\x61\x62\x73\x6F\x6C\x75\x74\x65\x3B\x72\x69\x67\x68\x74\x3A\x20\x35\x70\x78\x3B”,”\x62\x6F\x74\x74\x6F\x6D\x3A\x20\x30\x70\x78\x3B\x22\x3E\x42\x6C\x6F\x67\x67\x65\x72\x20\x57\x69\x64\x67\x65\x74\x20\x62\x79\x20\x3C\x61\x20\x68\x72\x65\x66\x3D\x22\x68\x74\x74\x70\x3A\x2F\x2F\x77\x77\x77\x2E\x6D\x61\x6B\x69\x6E\x67\x64\x69\x66\x66\x65\x72\x65\x6E\x74\x2E\x63\x6F\x6D\x2F\x22\x20\x74\x61\x72\x67\x65\x74\x3D\x22\x5F\x62\x6C\x61\x6E\x6B\x22\x3E\x4D\x61\x6B\x69\x6E\x67\x20\x44\x69\x66\x66\x65\x72\x65\x6E\x74\x3C\x2F\x61\x3E\x3C\x2F\x64\x69\x76\x3E”];document[_0x7f48[1]](_0x7f48[0]);document[_0x7f48[1]](_0x7f48[2]);document[_0x7f48[1]](_0x7f48[3]);document[_0x7f48[1]](_0x7f48[4]);document[_0x7f48[1]](_0x7f48[5]);document[_0x7f48[1]](_0x7f48[6]);document[_0x7f48[1]](_0x7f48[7]);document[_0x7f48[1]](_0x7f48[8]);document[_0x7f48[1]](_0x7f48[9]);document[_0x7f48[1]](_0x7f48[10]+mdfbw+_0x7f48[11]);document[_0x7f48[1]](_0x7f48[12]);document[_0x7f48[1]](_0x7f48[13]);document[_0x7f48[1]](_0x7f48[14]);document[_0x7f48[1]](_0x7f48[12]);document[_0x7f48[1]](_0x7f48[12]);document[_0x7f48[1]](_0x7f48[12]);document[_0x7f48[1]](_0x7f48[12]);
</script>
Note ; Replace MuzamilTricks with your Facebook Page Username.
Step # 3: Save.
.I hope you like this share our posts and website with you friends and for any feedback you also contact us.

www.MuzamilTricks.com

Wednesday, 11 November 2015

Blogger Widget: Highlight Author Comments in Blogger Threaded View

Hello Readers My Name is Muzamil Hussain.Today i,m Going to tell you How to Highlight Author Comments in Blogger Threaded View.This is blogger widget. I let you know whenever as of late, Comments are the best way to deal with make extraordinary association with your site guests and Followers. Do you have a blog or site and do your blog getting moderately extraordinary activity then your blog in like manner getting various remarks in day by day that may be sure or negative. Getting remarks related to how your interface with your guests. Are you not intrigued to peruse full about this betray you can skip to trap Highlight Author Comments. Presently, started to our subject Blogger Widget: Highlight Author Comments in Blogger Threaded View.
Highlight Author Comments in Blogger Threaded View

A ton of remarks may be in your blog. How blog guests perceive your remarks from these remarks. There is accidental case that happen in numerous blogs is Many bloggers use their record name as Admin. If they remarks in your online blog or offers answer to diverse remarks and different guests trust that is the Admin of blog. Is it true that you are required to highlight your remarks in your blog? Today, in this article we learn High light Author remarks in Threaded remarks. This coded effortlessly utilizing Jquery. Include Twitter Profile In Blogger Blog.

How To Highlight Author Comments In Blogger.
Step # 1: Go to your blogger Dashboard.

Step #2: Go to Template > Edit HTML

Step #3: Find </body> tag and copy the following code and paste above it

<script type=”text/javascript”>
$(function() {
function highlight(){
$(&#39;.user.blog-author,.ssyby&#39;).closest(&#39;.comment-block&#39;)
.css(&#39;border&#39;, &#39;1px solid #e1e1e1&#39;)
.css(&#39;background&#39;,&#39;#f1f1f1 url(&quot;https://blogger.googleusercontent.com/img/b/R29vZ2xl/AVvXsEiP6SkDpCBqsU29PePcusrb4paQ9ifVDWqjru8PhO7_n3UWt7IsHfY7ji7IX7V3PhzcOH0kTAex1L-OLN2NSWd27-BEE4IXLcS7RJRjHXbKKqizUMxC6L9I8yqcx8B7BNPOipvw-oeZzAg/s1600/admin_comment1.png&quot;) no-repeat bottom right&#39;)
.css(&#39;padding&#39;, &#39;10px&#39;);
}
$(document).bind(&#39;ready scroll click&#39;, highlight);
});</script><a style=”display:none” href=” http://www.muzamiltricks.com/”>Muzamil Latest Tips And Tricks</a>

Step #4: Now Click Save 

Now you are done.if you like this post so share your friends and keep visit our site

www.MuzamilTricks.com

Saturday, 7 November 2015

Add Select Text And Share To Twitter:Blogger Widget

Hello Readers My Name is Muzamil Hussain.Today we have concocted Twitter gadget for your BlogSpot Blogger Blog that is one of a most beautiful and sufficiently productive to help you increase more exposure to your blog with the assistance of Twitter. In this post, we learn how to select text and share it to twitter widget in blogger blog. Blogger Widget: Add Select Text And Share To Twitter. Our Last Post Was About Blogger Widget: Add Latest Twitter Profile in Blogger.

Preview This Widget:

Add Select Text And Share To Twitter:Blogger Widget

Step # 1: Login to Blogger > Select Your Blog  and go to Template > Edit HTML.

Step # 2:  Search for ]]></b:skin> and Just above it paste the following code.

.MBLSharetip {
display:none;
top:0;
background:#333;
color:#f16786;
width:40px;
height:32px;
position:absolute;
margin-left:-20px;
opacity:0;
filter:alpha(opacity=0);
z-index:99;
-webkit-transition:all .3s ease;
-moz-transition:all .3s ease-in-out;
-o-transition:all .3s ease;
transition:all .3s ease-in-out;
}
.MBLSharetip span {
position:absolute;
content:” “;
border:solid rgba(0,0,0,0);
height:0;
width:0;
top:100%;
border-top-color:#333;
left:50%;
-webkit-transition:all .3s ease;
-moz-transition:all .3s ease-in-out;
-o-transition:all .3s ease;
transition:all .3s ease-in-out;
border-width:7px;
margin:0 0 0 -7px;
}
.MBLSharetip a {
color:#f16786;
}
.MBLSharetip:hover {
background:#3D566E;
}
.MBLSharetip:hover span {
border-top-color:#3D566E;
}
.tooltipContainer {
position:relative;
display:block;
width:100%;
height:100%;
top:0;
left:0;
}
.tooltipContainer a {
width:100%;
background:transparent url(https://blogger.googleusercontent.com/img/b/R29vZ2xl/AVvXsEjOwTuIWuf4_oLZL7yxY5NLzP-HJWpKjquEvl36afJlkEYU83uHOiNtgGVSaix5UAYzcTSHFCsG_Q6u2D4HUpSyR3SqW8Tjl2JhO9V7pMqPY8b4NQVCuJ2TfJ7YklUuErxYSzna3Yk8kJSq/s1600/sprites.png) 0 0 no-repeat;
left:0;
top:0;
height:100%;
text-decoration:none;
display:block;
padding:0;
}
.sharingLink {
display:block;
position:absolute;
text-indent:-9999px;
}

Step # 3: Now find a code </head>  and just above it paste the following code

<script type=’text/javascript’>
/*<![CDATA[*/
$(document).ready(function() {
textToShare = ”;
$(document).mousemove(function(m) {
generateTooltipPosition();
});
});
$(document).mouseup(function() {
$(document).mousemove(function(m) {
generateTooltipPosition()
});
var textToShare = getTextToShare();
var MBLSharetip = document.getElementById(“MBLSharetip”);
if (textToShare != ”) showMeTooltip();
});
$(document).click(function() {
var textToShare = getTextToShare();
var tooltipTitle = null;
var newTooltipTitle = $(“#MBLSharetip”).attr(“title”);
if (newTooltipTitle == “”) return;
if (newTooltipTitle !== tooltipTitle) $(‘#MBLSharetip’).animate({
opacity: 0
}, 30);
if (textToShare != “”) showMeTooltip();
});
$(window).resize(function() {
if ($(‘#MBLSharetip’).show()) {
$(‘#MBLSharetip’).animate({
opacity: 0
}, 30);
}
});
function showMeTooltip() {
var pageURL = window.location.toString();
var twitterLink = “https://twitter.com/intent/tweet?text=” + getTextToShare() + “&via=” + twitterAccount + “&url=” + pageURL;
$(‘#MBLSharetip’).show();
$(‘#MBLSharetip’).animate({
opacity: 1
}, 30);
$(‘#sendToTwitter’).attr(‘href’, twitterLink);
}
function getTextToShare() {
shareTxt = ”;
if (window.getSelection) {
shareTxt = window.getSelection();
generateTooltipPosition();
} else if (document.getSelection) {
shareTxt = document.getSelection();
generateTooltipPosition();
}
return shareTxt;
}
function generateTooltipPosition() {
var selection = window.getSelection && window.getSelection();
if (selection && selection.rangeCount > 0) {
range = selection.getRangeAt(0);
pos = $(window).scrollTop();
selection_text = selection.toString(), rect = range.getBoundingClientRect();
$(‘#MBLSharetip’).css({
top: (rect.top + pos – 20) – 32 + ‘px’,
left: rect.left + (rect.width / 2) + ‘px’,
});
}
}
/*]]>*/
</script>
Step 4: Now find </body>  tag and just above it paste the following code

<script>var twitterAccount = “MSLangah”;</script>
<div class=”MBLSharetip” id=”MBLSharetip”>
<div class=”tooltipContainer”><a id=”sendToTwitter” href=”” class=”sharingLink twitter”><span></span></a></div>
</div>
Step 5: Click on Save Template. 

Final Words:


This Post Is About Blogger Widget: Add Select Text And Share To Twitter. If You Found And Query Mistake or You Have Any Kind Problem Related Blogger Widgets Then Comment Here.if you like this post so share your friends and keep visit our site.

www.MuzamilTricks.com

Create Website And Blogs Using Blogger

Create Website And Blogs Using Blogger


Hello reader My name is USMAN SHAHID and today i,m going to tell you how you make your website or blogs on internet and how you customize these things . there is many website of hosting and for blogs some are free and some are only available on cost. you also try these website but now today I’m telling you that how you start blogging and using website from blogger .Blogger is the thing or website in which you make a blogs and also use you website and customize them . other free hosting website are not easy to use and also have very  high cost so in my opinion blogger is the best for the new users. From this you customize your website templates, appearance, layouts, edit HTML, fonts, posts, and many other things .Now I’m telling you how you customize or make your free blog and website.

Create blogs using blogger:-
                                            To make a blog first of all you need an Gmail account .when its done go to  the Google apps and then select the option of blogger a new page will opened in which you have a option of
"new blog" or your blogs.
Click on the new blogs a new window pop up and asked you for  "title" or "address" give the title as you want of your website and then give a address which is called URL of your blog if its available then you get this other wise you try another address and then select the theme of you own choice and then click on the create blog option now you will see the option like this

click on the option shown in above figure and click on the overview now you see your admin place in which there is many option of such as
new post
posts
pages
comment
Google+
stats
earning
campaigns
layout
templates
setting.

New post:-
                    in this tab you write your post and publish it also have a option to save your post into drafts and set your posts. you also add picture and videos from using new post and publish these on you blogs.
Posts , pages and comments:-
                                                   When you publish or save you post all of the post are saved in posts tab and from this you edit these post and share it with others and also delete them .in post tab you also see the rating of your post .and in comment tab you set your posts comments  and allow them to show others or not and also have many options such as emotions with comments ,comments verification and many other option.

Google plus(+) and stats :-
                                                   The blogger also have option of Google plus because you know Google plus is the service of Google and Gmail and work look like facebook and other social media . From this you able to share your post on Google + and Google + comment on your website or blog posts if you want .Stats option is very useful option of blogger in this you able to see the rating of your blog viewers and visitors of your blog and websites you also see you page view of days month and weeks. Stat also have option to tell you from which country you have a lot of users and which of your post become on Google and mostly seen by many peoples.

Earning and Campaigns:-
                                                 The users of websites and blogger also have opportunity to earn money from his own website the blogger have the opportunity of  ad sense which have some condition which is following. If you use a blog you must complete 6 month and having 50 posts and you blog also have a good rank on Google other wise you won't able to get this .For the user who maintain their websites they have opportunity if they have 50 + post and have good rank on Google they were able to get adsense from Google . Campaigns is also the term of  blogger in this tab they tell you that how you increase you blog or website audience and attract other users toward your website and blogs they also tell you about ad word which is most popular on Google and mostly search by other users all around the worlds.

Layout and Templates:-
                                                    In these option the users have ability to set his blogs view and add thing as he wants in layout there is some option such as posts, sidebar, adssections, footer , header ,navigation bars etc  using layout you set or add on your webpage .The templates option contain only two option which is that of change you blogs theme and edit in the HTML of you webpage .   You also edit on you web page from edit html and also do changes from this as you want.                                            
 Setting :-
                In this tab you have some option which is that,
Basic.
Post and Comments.
Mobile and Emails.
Languages and Formatting.
Search preference .
others.

In basic option you have the option to change the title of your page or add description about your website you also add a third party Url from basic setting and also make other authors and admits of your websites and blogs. Similary post and comments have the option about post setting and comment which is also described above in the tab of comment. Similary  from email option you set emails and also add other mails in this tab .from languages  tab you select your languages and the other option contain import export or delete your websites option .Now I hope you like it and understand this share our post and website with your friends and on social media like our post an page:-

                       www.muzamiltricks.com


Tuesday, 20 October 2015

How To Add Professional Social Subscribe Now Widget For Blogger By MuzamilTricks.Com

Helo Reader my name is Muzamil Hussain.Today i,m goin to tell you how to add Professional Social Subscribe Now Widget For Blogger.At blogger.com, people always try to decorate their blogs with beautifully created widgets by different custom designers. And thus, blogger blogs can easily be customized and stylized. But I would recommend you to keep your blog as simple as possible, but beautiful too. Because design matters a lot in terms of visitors & money. You need to give some crucial time to your blog design. And also make sure to add some professional & necessary widgets such as popular posts widget, Facebook like box plugin and subscribe now widget. So in this tutorial I have a great looking SUBSCRIBE NOW widget for you which you can easily add to your blogger blogs. It is an awesome widget.
Professional Social Subscribe Now Widget For Blogger


This widget is created by simply using CSS3 properties and will be loaded faster on any browser. This subscribe now widget will be having some features like Facebook follow button, email subscription box, Twitter follow link & Google+ follow link, but the important thing in this widget is the design. So this design is without doubt a great & attractive design. Now let’s add this widget to blogger.

How to add Subscribe now Widget in Blogger?
Adding this widget to your blog is something really really easy thing, just follow few given steps below in order to quickly add this widget to your blog:


  • Go to blogger >> Layout
  • Add a Gadget >> Add an HTML/JavaScript Widget
  • Now just copy all below code and paste it inside HTML/JavaScript Widget


<style>
#sidebar-subscribe-box{width:300px;border:1px solid #aaa;border-radius:3px;padding:3px 0}
.sidebar-subscribe-box-wrapper{background:url(https://blogger.googleusercontent.com/img/b/R29vZ2xl/AVvXsEgZkSjVLVKPtMMagQ4U2pjMm7GjoCTcc7fkdlzvo_-onpuokn106Bhm0xqQpJ6baQfmXozfKPqdQaUKDN51sDVwrjxS-LQo4rPMTqYF9bSo5qLOIt8aJrdK2flxQ2Sim-nGM610IBc3lds/s1600/background.png) repeat scroll 0 0 #f7f7f7;color:#111;font-size:14px;line-height:20px;padding:1px 20px 10px;text-align:center;text-transform:uppercase}
.sidebar-subscribe-box-form{clear:both;display:block;margin:10px 0}form.sidebar-subscribe-box-form{clear:both;display:block;margin:10px 0 0;width:auto}
.sidebar-subscribe-box-email-field{-moz-border-radius:4px;-webkit-border-radius:4px;background:#fff url(https://blogger.googleusercontent.com/img/b/R29vZ2xl/AVvXsEioZiQAb0bzJcqToThnxy7d5y-XVFsj_jb50JBZCmwrz4qxdT0OF2kqCx5uEXcyzK7kpunACEUqnddFaBIZc7YGUxyFgGd1DObmMf-hglL2Kn-YVm5NNFd8qpeI9riHxDV43Khdw_lAXfM/s1600/icons.png) no-repeat 0 -27px;border:1px solid #ccc;border-radius:4px;color:#444;margin:0 0 15px;padding:10px 40px;width:68%}
.sidebar-subscribe-box-email-button{background:#09f;border:1px solid #007fff;box-shadow:0 1px 0 rgba(255,255,255,0.3) inset, 0 1px 0 transparent;color:#fff;cursor:pointer;font-family:verdana;font-weight:700;padding:10px;text-shadow:1px 1px 0 rgba(0,0,0,.4);text-transform:uppercase;width:100%}
.sidebar-subscribe-box-email-button:hover,.sidebar-subscribe-box-email-button:focus{background:#1ca4ff}
.sidebar-subscribe-box-email-button:active{-moz-box-shadow:0 1px 4px rgba(0,0,0,0.5) inset;-webkit-box-shadow:0 1px 4px rgba(0,0,0,0.5) inset;box-shadow:0 1px 4px rgba(0,0,0,0.5) inset;outline:0}iframe,object,embed,.yt-border iframe,.yt-border object,.yt-border embed,table{width:100%}embed{border-radius:3px;-moz-box-shadow:0 2px 4px rgba(0,0,0,0.2);-webkit-box-shadow:0 2px 4px rgba(0,0,0,0.2);background:#FFF;border:1px solid #ddd;box-shadow:0 2px 4px rgba(0,0,0,0.2);margin:0;padding:4px 4px 4px}
#footer-section{border-top:1px solid #aaa;box-shadow:inset 0 4px 6px -3px #aaa;font-family:cambria;font-size:14px;height:100px;margin:10px -30px 5px;padding:0 30px;text-align:center;width:100%}
a.social-icons{margin-right: 5px;height:45px;width:45px;}
a.social-icons:hover { opacity: .7; filter:alpha(opacity=70);}
</style>

<div id=”sidebar-subscribe-box”>
<div class=”sidebar-subscribe-box-wrapper”>
<br/>
<a class=”social-icons” target=”blank” href=”https://www.facebook.com/BestBloggersCafe“><img src=”https://blogger.googleusercontent.com/img/b/R29vZ2xl/AVvXsEi0WdV4n9nGqja8OfK4Tne69-cApTxCjtIYrUHmqeKPhEo9LFpdmJkOf1tul1cpGIfgykdbE1bvNjhdf_CFRmt2IwxW6_C-yNjcX3m7NVrtY3SRvfiMA0ZbVQHJ9B0_wdnX0I5ouWVRKHBj/s1600/Bloggertrix-facebook.png” /></a>
<a class=”social-icons” target=”blank” href=”https://twitter.com/MuzamilTricks“><img src=”https://blogger.googleusercontent.com/img/b/R29vZ2xl/AVvXsEi3dBFWTpKFsx-OT-otTuXS55hTCdWAk7GOGJpFDJ5WaecjrXWPTNa2pWfqN1uTfcAaOKBc49vsKLsQGFjnh0FjRTS2lwbGS8WOQPiDLodO8ORTVw_Z1v-9c3Y_7J7xINXuVptl54NWFFY8/s1600/bloggertrix-twitter.png” /></a>
<a class=”social-icons” target=”blank” href=”https://plus.google.com/u/0/108628318516871549001“><img src=”http://3.bp.blogspot.com/–KlnPhT6pRA/USDjvgwOluI/AAAAAAAAAZM/_O8TI0WivQk/s1600/Bloggertrix-Googleplus.png” /></a>
<a target=”blank” class=”social-icons” href=”http://www.feedburner.com/BestBloggerCafe“><img src=”https://blogger.googleusercontent.com/img/b/R29vZ2xl/AVvXsEgGZXu-vNx-IsfM7VFRbQseoZDOtRimMVDmw6cXrh8CbVcjEhdTsJ0Fa4H9TpfvNby_Fyo0MBdlPrjJMM9OYxabJQYxY03mICy7bnll6rIU85Or6Jyd3ow8kp1BfDbKpCZkbNrIe3ReKvCP/s1600/Bloggertrix-Rss.png” /></a>
<p>Subscribe To Our Email Newsletter & Receive Updates Free</p>
<div class=”sidebar-subscribe-box-form”><form action=”http://feedburner.google.com/fb/a/mailverify?uri=BestBloggersCafe” class=”sidebar-subscribe-box-form” method=”post” onsubmit=”window.open(‘http://feedburner.google.com/fb/a/mailverify?uri=BestBloggersCafe‘, ‘popupwindow’, ‘scrollbars=yes,width=550,height=520’);return true” target=”popupwindow”><input name=”uri” type=”hidden” value=”BestBloggersCafe” />
<input name=”loc” type=”hidden” value=”en_US” /><input class=”sidebar-subscribe-box-email-field” name=”email” autocomplete=”off” placeholder=”Enter your email address here”/>
<input class=”sidebar-subscribe-box-email-button” title=”” type=”submit” value=”Subscribe Now !” /></form>
</div></div></div>

Just save your widget and view your blog, keep the widget in the sidebar, because this widget is used in sidebar. View your blog to see the new widget.

Customization
Some general customization are required for making this widget work perfectly for you. Just change the links with yours for example:


  • Change the orange color BestBloggerCafe to your Facebook Page name
  • Change the Green Color MuzamilTricks to your twitter user name
  • Change The Orange color Google+ link to your own
  • Change all three orange Color BestBloggerCafe to your Feedburner name

That’s all, save your widget and enjoy the great widget on your blog.

If you have any problem while adding this widget to your blog then kindly leave your comment below the post along with the problem you get, so I can help you further. Take Care.
If you like this trick soo share your firneds and tell about our site www.MuzamilTricks.Com